
Abusing windows accessibility features | sethc.exe | sticky keys | persistence and privilege escalation

https://attack.mitre.org/techniques/T1546/008/

https://www.youtube.com/watch?v=dIuQ2sUsZEo


 sethc.exe resides on windows\system32 folder. in sethc.exe even administrators does not have full access. only the owner of the system which you can say trustedinstaller has the full access. but you can change the trustedinstaller by clicking the Advanced options. you can change the trustedinstaller by clicking the change button and add a local user who has admin rights. 


here action is performed in a domain environment. but you can add your local user as well. as an example i had added my username which is Avi who has admin rights on the system. 

now sethc owner has been changed. as you are owner now of sethc so you can now decide whom you want to give full access. 


 now click on edit. now you can change permissions. give administrators full control permissions. click yes on the popup. 

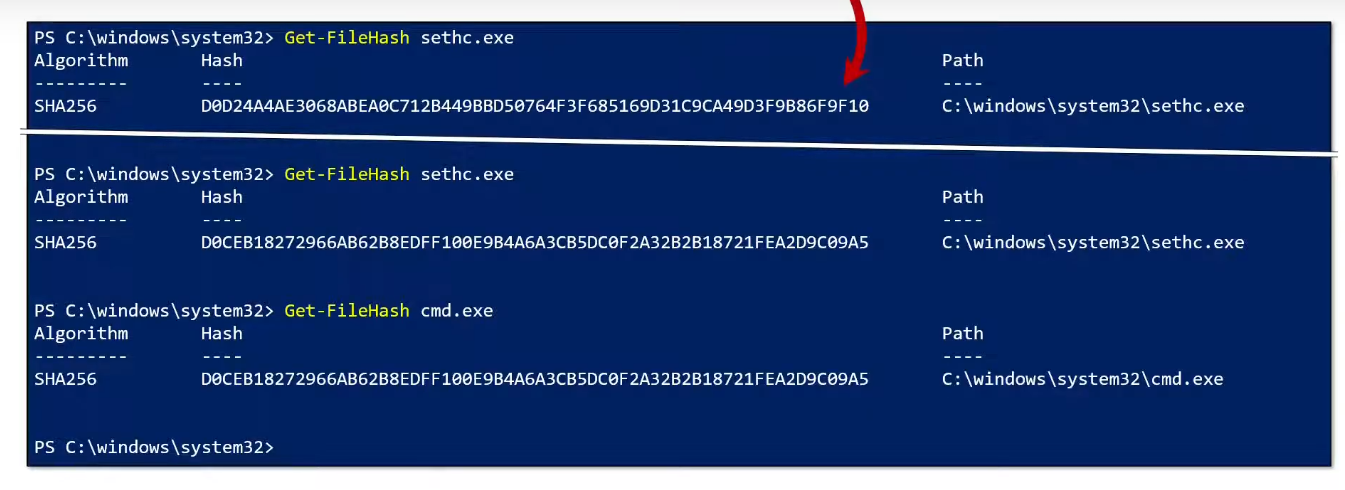
now you can rename the file. so rename the sethc.exe to sethc.exe.bak

then make a copy of cmd.exe. then you shall get cmd - Copy.exe

now rename cmd - Copy.exe to sethc.exe

done. 

now whenever you press 5 times shift key, a command prompt will open. and will be running of the current user session. if you are login as admin then the command prompt will also launch in the context of that admin rights. during the system is locked then it will run in the context of nt authority\system

it will give you persistency, elevation of privilege because it will still work if the system rebooted, or admin user get disabled or password changed scenario. it is still work if the system is accessed by remotely. 


Detection:


as this is not a malware activity but good AV like windows defender can also detect this behavior change anomaly. however as you are running this as local admin so from the Action setting on defender, you can allow on this device. 


but there is a way where you can specify that threats cannot be allowed on this device. here is how you can tightend up in an enterprise environment.


expand the windows components.


 disabling local list merging. it forces microsoft defender to ignore any configuration changes or exception which have been defined on the local machine by any user. instead it says use the values set on the group policy. once the group policy is updated (gpupdate /force) the exception we added earliar will be deleted from the allowed threats and you cannot make the exception again. 


note:

replacing accessibility feature binaries needs to be digitally signed for x64 systems. the binaries must reside in Windows\System32 folder. and it must be protected by windows file or resource protection (WFP/WRP).


Comments

Popular posts from this blog

API hacking lab setup

 Follow the commands to install and configure API hacking lab: 1. Install kali linux and update all the packages.  apt update -y apt upgrade -y or apt dist-upgrade -y or apt full-upgrade -y If you face any problem regarding update, install cloud flare warp in the host machine, then again start updating packages in your kali vm.  2. Install and configure burpsuite professional.  Open burpsuite and go to Extender tab. Click on BAppStore. Search for Autorize extension, It will help us to automate authorization testing. Click on Download Jython. From Jython website click on Jython standalone and save it. Go to Extender > Options and under python environment select the jython jar file that you just downloaded. Now again go to BAppStore and re-search for Autorize extension. You will see Install option this time after selecting Autorize extension. Install it. You will see all the installed extensions under Extender > Extensions tab.  3. Install foxy proxy to prox...

Installing Codename SCNR web application scanner on ubuntu | kali

  Perform the following steps from a non-root user. We will go for manual installation.  https://github.com/scnr/installer?tab=readme-ov-file#manual-installation https://github.com/scnr/installer/releases wget https://github.com/scnr/installer/releases/download/v1.7.3/scnr-v1.7.3-linux-x86_64.tar.gz   (Download using normal user) tar -xvzf scnr-v1.7.3-linux-x86_64.tar.gz cd scnr-v1.7.3 cd bin Now go to their website ( https://ecsypno.com/products/scnr ) and subscribe for community edition license from your official email.  ./scnr_activate 6XQ97FW3LVBECD0UJ5H214 ./scnr https://www.example.net/Login.aspx --system-slots-override Now they generate .ser format report after testing the application by default which is hard to read. We need html report. So for example, to generate an HTML report: ./scnr_reporter --report=html:outfile=my_report.html.zip /home/user/.scnr/reports/report.ser Avi

Install Nessus from docker

Docker installation. Give the below commands one by one. apt install docker-cli or apt install docker.io After the installation is complete, if you are inside wsl then give this command to start docker, because inside wsl systemd (systemctl) does not work: service docker start WSL troubleshooting : If the above command " service docker start " does not work then use below command: dockerd (It may not work if any previous docker process is running. It will show you pid of that process. Use this command to kill that process " kill -9 pid " and run dockerd command again) If " docker ps -a " giving error like " Cannot connect to the Docker daemon at unix:///run/podman/podman.sock. Is the docker daemon running? " This is because you may installed podman-docker package. If you remove the package still you will get this error but you should remove the package. Then issue this command: env | grep -i docker DOCKER_HOST=unix:///run/podman/podman.sock   --...